Using the Grin Wallet API
A basic introduction on how to properly communicate with the grin-wallet API
Project maintained by grincc Hosted on GitHub Pages — Theme by mattgraham
Tutorial
- Tutorial
- Introduction
- Installing the latest version of grin wallet and node
- Starting node and wallet APIs
- Running Grin Node as a Service
- Preparing a Python virtual environment
- Generating a private key
- Obtaining the shared key
- Wallets in Grin
- Working with transactions
- Retrieving last known height
- Extras
- Contributors
Introduction
This document will define the basis of proper communication with the grin-wallet API, which is the use of secure JSON-RPC calls. A shared key must first be calculated before calling any other JSON-RPC method. All subsequent requests and responses will then be encrypted and decrypted with the following parameters:
- AES-256 in GCM mode with 128-bit tags and 96 bit nonces
- 12 byte nonce which must be included in each request/response to use on the decrypting side
- Empty vector for additional data
- Suffix length = AES-256 GCM mode tag length = 16 bytes
JSON-RPC requests should be encrypted using these parameters, encoded into base64 and included with the one-time nonce.
Before starting make sure you have installed the next tools: git, openssl, wget, curl, sha256sum, tar, tor, wget, python3.8, libncursesw5, php
This document assumes that you are running Linux. You will need to create a $CHAIN variable in your environment, if you intend to use Testnet the value of $CHAIN must be test, but if you are using Mainnet, the value must be main:
For Mainnet:
export CHAIN="main"
For Testnet:
export CHAIN="test"
Before continuing with this tutorial, please clone this repository:
git clone https://github.com/grincc/grin-wallet-api-tutorial.git
Move inside the folder:
cd tutorial
Now we can start.
Installing the latest version of grin wallet and node
Go to grin.mw/download and download the tgz files of grin and grin-wallet by clicking on their name titles, or alternatively, type in the terminal:
wget https://github.com/mimblewimble/grin/releases/download/v5.1.2/grin-v5.1.2-linux-amd64.tar.gz
wget https://github.com/mimblewimble/grin-wallet/releases/download/v5.1.0/grin-wallet-v5.1.0-linux-amd64.tar.gz
To verify the release, calculate the sha256sum of the binaries and compare the result against their respective SHA256 HASH on the website (or in releases).
sha256sum grin-v5.1.0-linux-amd64.tar.gz
sha256sum grin-wallet-v5.1.0-linux-amd64.tar.gz
Next, navigate to the directory where the files were downloaded and extract the binaries:
sudo tar -C /usr/local/bin -xzf grin-v5.1.2-linux-amd64.tar.gz --strip-components=1
sudo tar -C /usr/local/bin -xzf grin-wallet-v5.1.0-linux-amd64.tar.gz --strip-components=1
NOTE: In every command replace v5.1.2 and v5.1.0 with the appropriate stable version for each binary. For the node go here and for the wallet go here.
Starting node and wallet APIs
Now, open 3 new tabs from your terminal. In the first tab, run the node with the next command for Mainnet:
grin
For Testnet:
grin --testnet
In the second tab, you need to start the wallet api, for Mainnet:
grin-wallet owner_api --run_foreign
For Testnet:
grin-wallet --testnet owner_api --run_foreign
The Owner API is intended to expose methods that are to be used by the wallet owner only; the Foreign API contains methods that other wallets will use to interact with the owner’s wallet.
Use the third tabs to go through the next steps.
Running Grin Node as a Service
Before continuing let’s create a service to manage the node.
Go to the tab where the node is running and press Q. Now open the node configuration like this:
nano .grin/$CHAIN/grin-server.toml
Find the run_tui parameter and change it to false.
run_tui = false
If you want to run your node in a separate server from the wallet (which is recommended), please change api_http_addr to run on: 0.0.0.0, example:
api_http_addr = "0.0.0.0:3413"
NOTE: Be aware that you will probably need to properly configure your firewall.
Next, create a file here: /etc/.grinconf with this content for Mainnet:
CHAIN_TYPE=""
Or this for Testnet:
CHAIN_TYPE="--testnet"
This will tell the node which is the desired chain. Now create a file on /etc/systemd/system/grin.node.service and paste the next content inside:
[Unit]
Description=Grin Node Service
After=network.target

[Service]
Type=simple
EnvironmentFile=/etc/.grinconf
ExecStart=/usr/local/bin/grin $CHAIN_TYPE
Restart=always
User=root
Group=root

[Install]
WantedBy=multi-user.target
NOTE: Make sure ExecStart contains the correct path.
One can now enable and start the node service:
systemctl enable grin.node.service && systemctl start grin.node.service
We can check the status like this:
systemctl status grin.node.service
You will now see the status:
grin.node.service - Grin Node Service
   Loaded: loaded (/etc/systemd/system/grin.node.service; enabled; vendor preset: enabled)
   Active: active (running) since Sun 2022-07-10 12:50:14 CEST; 3h 49min ago
 Main PID: 26784 (grin)
    Tasks: 89 (limit: 2359)
   Memory: 600.8M
   CGroup: /system.slice/grin.node.service
           └─26784 /usr/local/bin/grin
Preparing a Python virtual environment
A virtual environment is a Python environment such that the Python interpreter, libraries and scripts installed into it are isolated from those installed in other virtual environments, and (by default) any libraries installed in a “system” Python, i.e., one which is installed as part of your operating system. In order to create a virtual environment, run the next command:
python3 -m virtualenv --python=python3.8 .venv
After that, proceed to activate the recently created environment:
source .venv/bin/activate
After activating the virtual environment, we need to install all dependencies. In order to do so, execute the next command:
pip install -r requirements.txt
NOTE: All the steps below must be followed inside the virtual environment.
Generating a private key
In order to obtain the shared key we first need to have a private key. Run the next command to generate and encrypt your private key using a strong pass phrase:
openssl ecparam -genkey -name secp256k1 -param_enc explicit | openssl ec -aes256 -out private_key.pem
You have to get an output like the next:
read EC key
writing EC key
Enter PEM pass phrase:
Verifying - Enter PEM pass phrase:
Make sure to keep the key file private_key.pem and the pass phrase used safe.
To confirm that the key was successfully created, execute the next command:
$ ls -lh private_key.pem
-rw-r--r--  1 david  staff   529B Jul 10 15:53 private_key.pem
You can also read the private key like this:
openssl pkey -in private_key.pem -inform pem -noout -text
You will see something like this:
Enter pass phrase for private_key.pem:
Private-Key: (256 bit)
priv:
    08:f5:49:3d:3e:08:7f:57:65:dd:05:93:e0:b0:56:
    9d:4e:da:ff:b8:40:7e:70:ee:85:33:b9:08:fe:b6:
    b5:ae
pub:
    04:f6:55:f6:5d:01:2d:2e:ca:4a:35:1c:6f:89:ae:
    73:88:9d:28:a4:88:65:bf:6e:58:6d:1a:3c:1f:37:
    8f:68:09:8d:37:1b:96:a5:61:17:b0:6f:11:b9:fa:
    02:f8:65:16:77:30:7a:18:09:f8:28:1f:22:b8:0c:
    52:e6:de:07:e6
Field Type: prime-field
Prime:
    00:ff:ff:ff:ff:ff:ff:ff:ff:ff:ff:ff:ff:ff:ff:
    ff:ff:ff:ff:ff:ff:ff:ff:ff:ff:ff:ff:ff:fe:ff:
    ff:fc:2f
A:    0
B:    7 (0x7)
Generator (uncompressed):
    04:79:be:66:7e:f9:dc:bb:ac:55:a0:62:95:ce:87:
    0b:07:02:9b:fc:db:2d:ce:28:d9:59:f2:81:5b:16:
    f8:17:98:48:3a:da:77:26:a3:c4:65:5d:a4:fb:fc:
    0e:11:08:a8:fd:17:b4:48:a6:85:54:19:9c:47:d0:
    8f:fb:10:d4:b8
Order:
    00:ff:ff:ff:ff:ff:ff:ff:ff:ff:ff:ff:ff:ff:ff:
    ff:fe:ba:ae:dc:e6:af:48:a0:3b:bf:d2:5e:8c:d0:
    36:41:41
Cofactor:  1 (0x1)
Obtaining the shared key
We need to obtain a shared key to be able to communicate securely with the API; for this we will use the private key generated previously. Run the next command and pass the path of the PEM file of the private key:
python scripts/python/$CHAIN/get_shared_secret.py private_key.pem 2> /dev/null > ~/.grin/$CHAIN/.shared_secret
The secret key will be written on the next path ~/.grin/$CHAIN/.shared_secret you can confirm that everything is OK by displaying the content of the file:
ls -lh ~/.grin/$CHAIN/.shared_secret
It should be a 64 bytes file:
-rw-r--r-- 1 david staff 64B Jul 10 16:02 /Users/david/.grin/$CHAIN/.shared_secret
cat ~/.grin/$CHAIN/.shared_secret
You should see something like this next:
3a82acc078e6db6bf08dc1b17c65f001e64a237f1a1e162d91b467221d907575
This is the shared key and will be used then to encrypt and decrypt the parameters and the responses with the API. This shared_secretkey will be use to encrypt and decrypt the API calls and response. This must be done every time you start the owner API.
Wallets in Grin
A wallet is where you keep your private keys, which keeps your crypto assets safe and accessible. With a wallet, you can also send, receive, and spend your coins.
Creating a wallet
Now, we are ready to create a wallet. Remember that the wallet information will be stored in the directory set in the previous step by calling the set_top_level_directory method or in ~/.grin/$CHAIN/wallet_data by default if set_top_level_directory has not been called. In order to create a wallet we will need to call: create_wallet, which parameters are the next:
{
    "name": null,
    "mnemonic": null,
    "mnemonic_length": 32,
    "password": "my_secret_password"
}
Parameters: name and mnemonic are optional, mnemonic_length specify the length of the seed phrase and password is the password of the wallet. This password is also used to encrypt the wallet data on disk.
./scripts/bash/$CHAIN/create_wallet.sh $(cat ~/.grin/$CHAIN/.shared_secret)
To confirm that the wallet was created, please go to the path previously set and list the file:
ls -lh
You should see something like this:
drwxr-xr-x 5 david staff 160B Jul 10 16:20 wallet_data
Opening a wallet
Now that the wallet is created, we can open it. This means that we can interact with the wallet. In order to do so we need a token, this token will be used as a parameter for those calls that are related to the wallet. To get this token we need to call the open_wallet method with the next parameters:
{
    "jsonrpc": "2.0",
    "method": "open_wallet",
    "params": {
        "name": null,
        "password": "my_secret_password"
    },
    "id": 1
}
The parameter name is the name of the wallet, this parameter can be null for now, and password is the password of the wallet.
./scripts/bash/$CHAIN/open_wallet.sh $(cat ~/.grin/$CHAIN/.shared_secret) .wallet_token
This will print an output like this for example, then we are going to use cat to confirm the value token stored in the file:
$ ./scripts/bash/$CHAIN/open_wallet.sh $(cat ~/.grin/$CHAIN/.shared_secret) .wallet_token
Password of the wallet:
Wallet opened [token=206fe2b943656b4ebc75c67931b327437f0713180d79f30a526d7a0b1a34692b]
$ cat .wallet_token
206fe2b943656b4ebc75c67931b327437f0713180d79f30a526d7a0b1a34692b
We need the token to execute most of the call within the Owner API.
Obtaining wallet balance
To get the summary information from the active account in the wallet the method name is: retrieve_summary_info. The parameters are: token, refresh_from_node and minimum_confirmations:
token- Token of the opened wallet.refresh_from_node- If true, the wallet will attempt to contact a node (via the NodeClient provided during wallet instantiation). If false, the results will contain transaction information that may be out-of-date (from the last time the wallet’s output set was refreshed against the node). Note this setting is ignored if the updater process is running via a call to start_updaterminimum_confirmations- The minimum number of confirmations an output should have before it’s included in the ‘amount_currently_spendable’ total
The structure must be like this for example:
{
    "jsonrpc": "2.0",
    "method": "retrieve_summary_info",
    "params": {
        "token": "d202964900000000d302964900000000d402964900000000d502964900000000",
        "refresh_from_node": true,
        "minimum_confirmations": 1
    },
    "id": 1
}
Inside the script folder there is a helper for this:
./scripts/bash/$CHAIN/retrieve_summary_info.sh $(cat ~/.grin/$CHAIN/.shared_secret) $(cat ./.wallet_token)
Example output:
[
  true,
  {
    "amount_awaiting_confirmation": "0",
    "amount_awaiting_finalization": "0",
    "amount_currently_spendable": "0",
    "amount_immature": "0",
    "amount_locked": "0",
    "amount_reverted": "0",
    "last_confirmed_height": "1825853",
    "minimum_confirmations": "1",
    "total": "0"
  }
]
-The first element is a boolean element and indicates whether the data was successfully refreshed from the node (note: this may be false even if the refresh_from_node argument was set to true.)
-The second element contains the Summary Wallet Information.
Again, you can use jq to parse the output; if you want to know whether or not the data was successfully refreshed from the node you can do it like this:
refreshed=$(./scripts/bash/$CHAIN/retrieve_summary_info.sh $(cat ~/.grin/$CHAIN/.shared_secret) $(cat ./.wallet_token) | jq '.[0]')
If you echo $refreshed you should see something like this:
$ echo $refreshed
true
To get the spendable balance you can do it also using jq:
spendable=$(./scripts/bash/$CHAIN/retrieve_summary_info.sh $(cat ~/.grin/$CHAIN/.shared_secret) $(cat ./.wallet_token) | jq -r '.[1].amount_currently_spendable')
Example:
$ echo $spendable
0
Getting the wallet address (Slatepack Address)
A Slatepack address is a bech32 encoded address, similar to those used in Bitcoin. However, Slatepack addresses do not touch the network; they are used strictly for transaction building between two wallets, and never appear on-chain or represent ownership. Addresses are exchanged between parties to serve as instructions for how to complete the payment. Therefore, a Slatepack address serves a double purpose:
- It decodes to a Tor address.
- Acts as a key to encrypt the transaction data being communicated by Slatepack Messages (strings).
To retrieve the public Slatepack address associated with the active account at the given derivation path, you just need to call the method get_slatepack_address like this:
{
    "jsonrpc": "2.0",
    "method": "get_slatepack_address",
    "params": {
        "token": "d202964900000000d302964900000000d402964900000000d502964900000000",
        "derivation_index": 0
    },
    "id": 1
}
In this case, an “address” means a Slatepack address corresponding to a private key derived as follows:
e.g. The default parent account is at m/0/0
With output blinding factors created as
m/0/0/0 m/0/0/1 etc...
The corresponding public address derivation path would be at: m/0/1
With addresses created as:
m/0/1/0 m/0/1/1 etc...
Note: these addresses correspond to the public keys used in the addresses of TOR hidden services configured by the wallet listener.
Example using derivation_index = 0:
./scripts/bash/$CHAIN/get_slatepack_address.sh $(cat ~/.grin/$CHAIN/.shared_secret) $(cat ./.wallet_token) 0
Output:
grin14r5a3cqcc5v8mqpagsr28nt4c0uap9zfcpxmgfsqpc2xzan0uh9qp9ykf2
Example using derivation_index = 1:
./scripts/bash/$CHAIN/get_slatepack_address.sh $(cat ~/.grin/$CHAIN/.shared_secret) $(cat ./.wallet_token) 1
Output:
grin1ndv4p79f4l39q2khe4f09zql2ed9kjy2emlv042q6e2v5r8cdk6s6r70rf
Working with transactions
Mimblewimble transactions are interactive, meaning both parties need some kind of communication to interact with each other and exchange the necessary data to create a transaction. Let’s see how a standard transaction flow looks like:
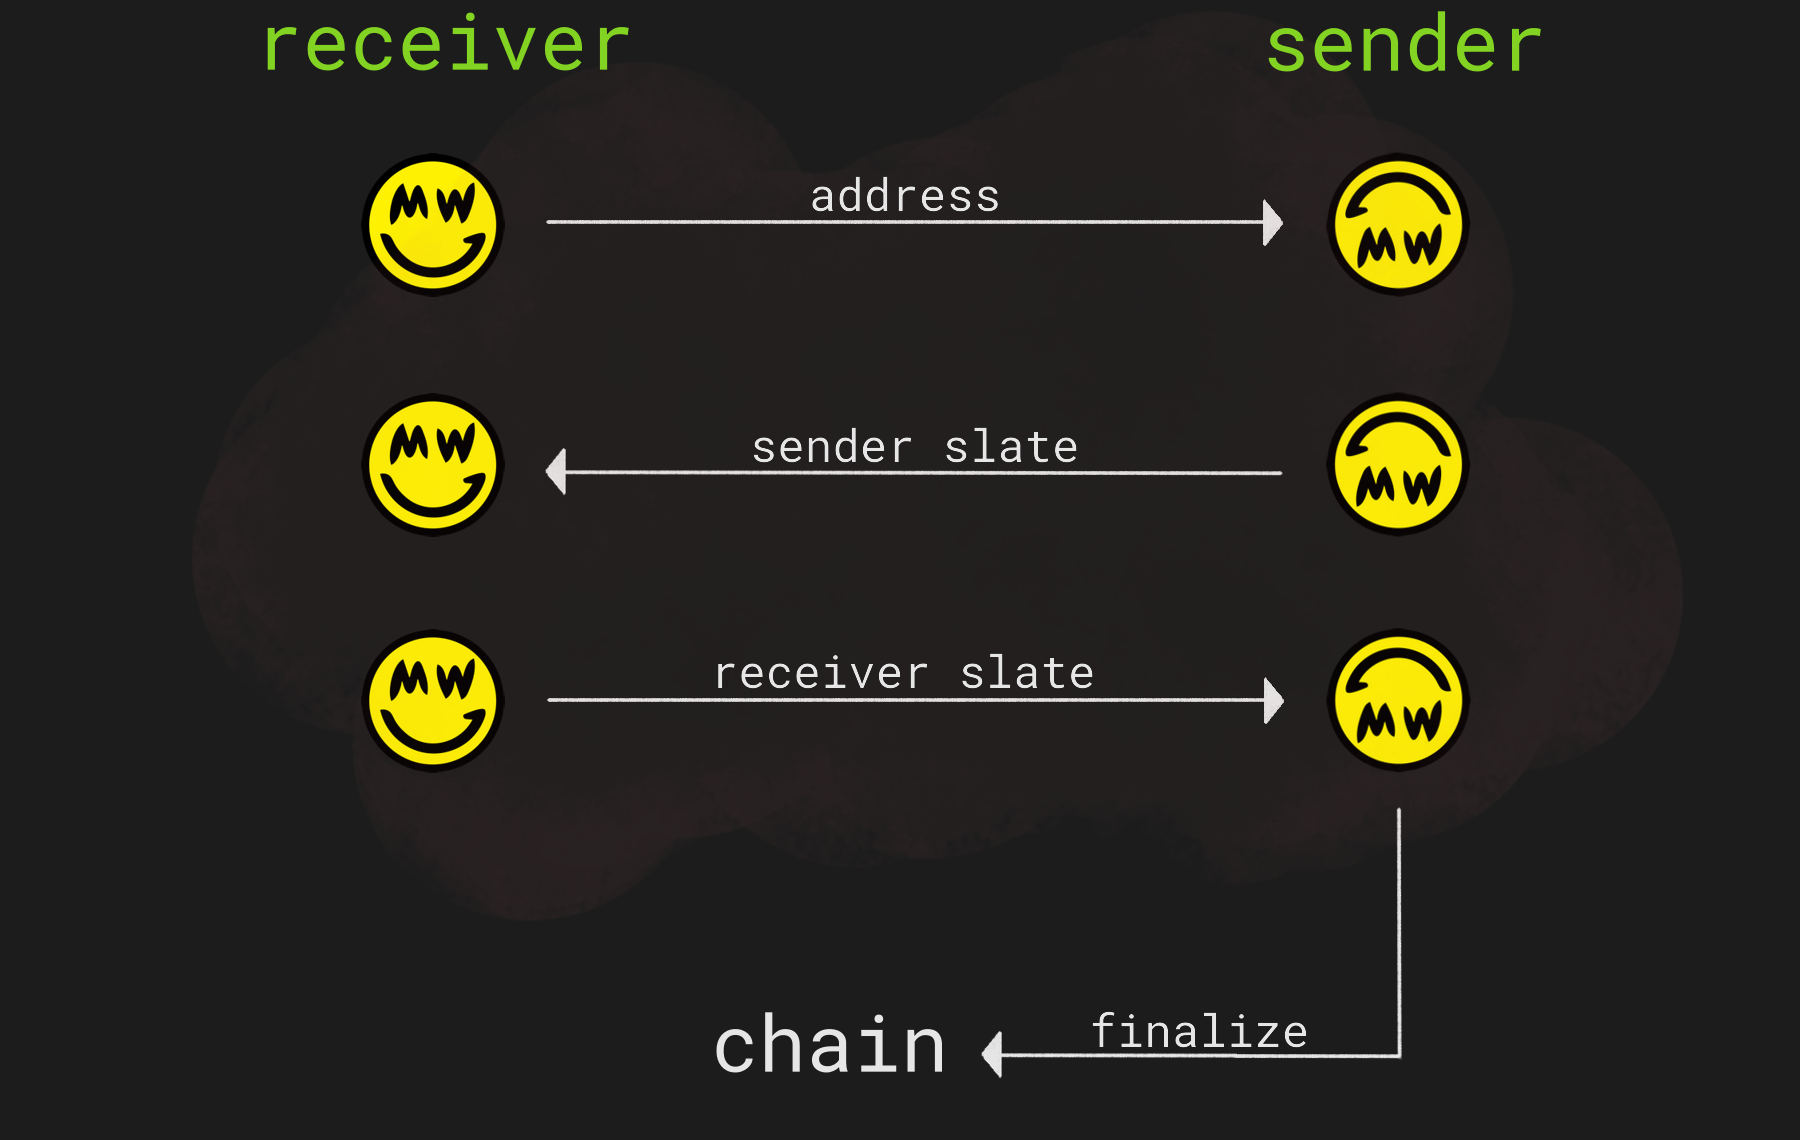
The slate is a sheet of incomplete transaction data. Wallets transfer it back and forth until the full signature is complete.
In more detail, the process goes as follows:
- An address, often referred to as a Slatepack Address, is provided by the receiver.
It is important to note; This slatepack address is only used to support peer-to-peer interaction, and is completely different from the familiar on-chain address, as it’s not part of the ledger. It is in fact an ed25199 public key which serves a double role:
- A Tor hidden service address.
- Key to encrypt the data communicated between the sender and receiver.
- Sender begins building the transaction slate, encrypts it with the receiver’s address (a public key), and passes it over.
- Receiver adds to the slate his own data and partial signature, and delivers it back.
- Sender finalizes the transaction by adding the final data and his own part partial signature to the slate, thus completing the transaction building process. He can then post it to the chain.
See more at the Grin Documentation
Receiving a transaction
A Slate contains its own separate representation of Grin’s internal Transaction object, this object is encoded within the Slatepack Message; therefore, the first step is to decode the Slatepack. To get the Slate from the Slatepack Message, we need to call slate_from_slatepack_message like this:
{
    "jsonrpc": "2.0",
    "method": "slate_from_slatepack_message",
    "params": {
        "token": "d202964900000000d302964900000000d402964900000000d502964900000000",
        "secret_indices": [0],
        "message": "BEGINSLATEPACK. 8GQrdcwdLKJD28F 3a9siP7ZhZgAh7w BR2EiZHza5WMWmZ Cc8zBUemrrYRjhq j3VBwA8vYnvXXKU BDmQBN2yKgmR8mX UzvXHezfznA61d7 qFZYChhz94vd8Ew NEPLz7jmcVN2C3w wrfHbeiLubYozP2 uhLouFiYRrbe3fQ 4uhWGfT3sQYXScT dAeo29EaZJpfauh j8VL5jsxST2SPHq nzXFC2w9yYVjt7D ju7GSgHEp5aHz9R xstGbHjbsb4JQod kYLuELta1ohUwDD pvjhyJmsbLcsPei k5AQhZsJ8RJGBtY bou6cU7tZeFJvor 4LB9CBfFB3pmVWD vSLd5RPS75dcnHP nbXD8mSDZ8hJS2Q A9wgvppWzuWztJ2 dLUU8f9tLJgsRBw YZAs71HiVeg7. ENDSLATEPACK."
    },
    "id": 1
}
message - A string representing an armored Slatepack.
secret_indices - Indices along this wallet’s derivation path with which to attempt decryption. This function will attempt to use secret keys at each index along this path to attempt to decrypt the payload, returning an error if none of the keys match.
To see an example run the next:
./scripts/bash/$CHAIN/slate_from_slatepack_message.sh $(cat ~/.grin/$CHAIN/.shared_secret) $(cat ./.wallet_token)
Example:
$ ./scripts/bash/$CHAIN/slate_from_slatepack_message.sh $(cat ~/.grin/$CHAIN/.shared_secret) $(cat ./.wallet_token) > slate.json
BEGINSLATEPACK. 8GQrdcwdLKJD28F 3a9siP7ZhZgAh7w BR2EiZHza5WMWmZ Cc8zBUemrrYRjhq j3VBwA8vYnvXXKU BDmQBN2yKgmR8mX UzvXHezfznA61d7 qFZYChhz94vd8Ew NEPLz7jmcVN2C3w wrfHbeiLubYozP2 uhLouFiYRrbe3fQ 4uhWGfT3sQYXScT dAeo29EaZJpfauh j8VL5jsxST2SPHq nzXFC2w9yYVjt7D ju7GSgHEp5aHz9R xstGbHjbsb4JQod kYLuELta1ohUwDD pvjhyJmsbLcsPei k5AQhZsJ8RJGBtY bou6cU7tZeFJvor 4LB9CBfFB3pmVWD vSLd5RPS75dcnHP nbXD8mSDZ8hJS2Q A9wgvppWzuWztJ2 dLUU8f9tLJgsRBw YZAs71HiVeg7. ENDSLATEPACK.
$ cat slate.json
{
  "amt": "6000000000",
  "fee": "8000000",
  "id": "0436430c-2b02-624c-2032-570501212b00",
  "off": "d202964900000000d302964900000000d402964900000000d502964900000000",
  "proof": {
    "raddr": "783f6528669742a990e0faf0a5fca5d5b3330e37bbb9cd5c628696d03ce4e810",
    "saddr": "32cdd63928854f8b2628b1dce4626ddcdf35d56cb7cfdf7d64cca5822b78d4d3"
  },
  "sigs": [
    {
      "nonce": "031b84c5567b126440995d3ed5aaba0565d71e1834604819ff9c17f5e9d5dd078f",
      "xs": "023878ce845727f3a4ec76ca3f3db4b38a2d05d636b8c3632108b857fed63c96de"
    }
  ],
  "sta": "S1",
  "ver": "4:2"
}
Next, we need to call the method: receive_tx from the Foreign API which receives a transaction created by another party, returning the modified Slate object, modified with the recipient’s output for the transaction amount, and public signature data. This slate can then be sent back to the sender to finalize the transaction via the Owner API’s finalize_tx method.
This function creates a single output for the full amount and sets to a status of ‘Awaiting finalization’. It will remain in this state until the wallet finds the corresponding output on the chain, at which point it will become ‘Unspent’. The slate will be updated with the results of signing round 1 and 2, adding the recipient’s public nonce, public excess value, and partial signature to the slate.
Also creates a corresponding Transaction Log Entry in the wallet’s transaction log.
The positional parameters for this method are the next:
slate- The transaction Slate. The slate should contain the results of the sender’s round 1 (e.g, public nonce and public excess value).dest_acct_name- The name of the account into which the slate should be received. If None, the default account is used.r_addr- If included, attempts to send the slate back to the sender using the Slatepack sync send (TOR). If providing this argument, check the state field of the slate to see if the sync_send was successful (it should be S3 if the synced send sent successfully).
You can use one of the bash scripts inside this repository like this:
./scripts/bash/$CHAIN/receive_tx.sh default slate.json
Where default is the account and slate.json is the file where we store the slate. This will return a Slate which should be transformed into a Slatepack Message.
To create the Slatepack Message from the slate, we need to call create_slatepack_message and pass the slate like this:
{
    "jsonrpc": "2.0",
    "method": "create_slatepack_message",
    "params": {
        "token": "d202964900000000d302964900000000d402964900000000d502964900000000",
        "sender_index": 0,
        "recipients": [],
        "slate": {
            "ver": "4:2",
            "id": "0436430c-2b02-624c-2032-570501212b00",
            "sta": "S1",
            "off": "d202964900000000d302964900000000d402964900000000d502964900000000",
            "amt": "60000000000",
            "fee": "7000000",
            "sigs": [
                {
                    "xs": "030152d2d72e2dba7c6086ad49a219d9ff0dfe0fd993dcaea22e058c210033ce93",
                    "nonce": "031b84c5567b126440995d3ed5aaba0565d71e1834604819ff9c17f5e9d5dd078f"
                }
            ]
        }
    },
    "id": 1
}
token- Token of the opened wallet.sender_index- If Some(n), the index along the derivation path to include as the senderrecipients- Optional recipients for which to encrypt the Slatepack’s payload (i.e. the slate). If it is empty, the payload will remain unencrypted
Example:
./scripts/bash/$CHAIN/create_slatepack_message.sh $(cat ~/.grin/$CHAIN/.shared_secret) $(cat ./.wallet_token) signed_slate.json
This generated Slatepack Message must then be shared with the Sender.
Listing transactions
The retrieve_txs method returns a list of Transaction Log Entries from the active account in the wallet. Parameters are the follow:
{
    "jsonrpc": "2.0",
    "method": "retrieve_txs",
    "params": {
        "token": "d202964900000000d302964900000000d402964900000000d502964900000000",
        "refresh_from_node": true,
        "tx_id": null,
        "tx_slate_id": null
    },
    "id": 1
}
refresh_from_node- If true, the wallet will attempt to contact a node. If false, the results will contain transaction information that may be out-of-date (from the last time the wallet’s output set was refreshed against the node).tx_id- If Some(i), only return the transactions associated with the transaction log entry of id i.tx_slate_id- If some (uuid), only return transactions associated with the given Slate uuid.
Example:
./scripts/bash/$CHAIN/retrieve_txs.sh $(cat ~/.grin/$CHAIN/.shared_secret) $(cat ./.wallet_token) | jq '.[1]'
Output:
[
    {
      "amount_credited": "800000000",
      "amount_debited": "0",
      "confirmation_ts": null,
      "confirmed": false,
      "creation_ts": "2022-07-11T13:43:36.570880Z",
      "fee": null,
      "id": 0,
      "kernel_excess": "082cb678b271a4647f325fb77eb12f6387d8e456e33e7b8cf28eb00b498fdbf3e7",
      "kernel_lookup_min_height": 1825982,
      "num_inputs": 0,
      "num_outputs": 1,
      "parent_key_id": "0200000000000000000000000000000000",
      "payment_proof": null,
      "reverted_after": null,
      "stored_tx": null,
      "ttl_cutoff_height": null,
      "tx_slate_id": "d3a57cb7-b40d-4c71-8e19-b3bc79d50be0",
      "tx_type": "TxReceived"
    }
]
Canceling a transaction
In order to cancel a transaction, we could use the transaction slate id as a parameter for the cancel_tx method like this:
{
    "jsonrpc": "2.0",
    "method": "cancel_tx",
    "params": {
        "token": "d202964900000000d302964900000000d402964900000000d502964900000000",
        "tx_id": null,
        "tx_slate_id": "0436430c-2b02-624c-2032-570501212b00"
    },
    "id": 1
}
Example:
./scripts/bash/$CHAIN/cancel_tx.sh $(cat ~/.grin/$CHAIN/.shared_secret) $(cat ./.wallet_token) "d3a57cb7-b40d-4c71-8e19-b3bc79d50be0"
Now if we check the status, it should say TxReceivedCancelled:
$ ./scripts/bash/$CHAIN/retrieve_txs.sh $(cat ~/.grin/$CHAIN/.shared_secret) $(cat ./.wallet_token) | jq '.[1]'
[
  {
    "amount_credited": "800000000",
    "amount_debited": "0",
    "confirmation_ts": null,
    "confirmed": false,
    "creation_ts": "2022-07-11T13:43:36.570880Z",
    "fee": null,
    "id": 0,
    "kernel_excess": "082cb678b271a4647f325fb77eb12f6387d8e456e33e7b8cf28eb00b498fdbf3e7",
    "kernel_lookup_min_height": 1825982,
    "num_inputs": 0,
    "num_outputs": 1,
    "parent_key_id": "0200000000000000000000000000000000",
    "payment_proof": null,
    "reverted_after": null,
    "stored_tx": null,
    "ttl_cutoff_height": null,
    "tx_slate_id": "d3a57cb7-b40d-4c71-8e19-b3bc79d50be0",
    "tx_type": "TxReceivedCancelled"
  }
]
Sending a transaction
The API method to start a transaction is: init_send_tx. This initiates a new transaction as the sender, creating a new Slate object containing the sender’s inputs, change outputs, and public signature data. When a transaction is created, the wallet must also lock inputs (and create unconfirmed outputs) corresponding to the transaction created in the slate. This is so the wallet doesn’t attempt to re-spend outputs that are already included in a transaction before the transaction is confirmed.
The JSON structure of the call looks as follows:
{
    "jsonrpc": "2.0",
    "method": "init_send_tx",
    "params": {
        "token": "d202964900000000d302964900000000d402964900000000d502964900000000",
        "args": {
            "src_acct_name": null,
            "amount": "6000000000",
            "minimum_confirmations": 2,
            "max_outputs": 500,
            "num_change_outputs": 1,
            "selection_strategy_is_use_all": true,
            "target_slate_version": null,
            "payment_proof_recipient_address": "grin19f96nfdyl7kjqslqg5j3fu69ejnu82nzewlnc4duehgssg3e9tvq0fsuj5",
            "ttl_blocks": null,
            "send_args": null
        }
    },
    "id": 1
}
token- Token of the opened wallet.args- Transaction initialization arguments.
This method returns the transaction Slate, which can be forwarded to the receiving party by any means after encoding the information into a Slatepack Message.
Example of sending 0.1 grins:
./scripts/bash/$CHAIN/init_send_tx.sh $(cat ~/.grin/$CHAIN/.shared_secret) $(cat ./.wallet_token) "default" $((0.1 * ((10 ** 9)))) grin19f96nfdyl7kjqslqg5j3fu69ejnu82nzewlnc4duehgssg3e9tvq0fsuj5 > slate.json
This slate can be sent to the receiving party by any means via TOR.
Sending slates via the Foreign API using TOR
In order to do send it, you need to decode the Onion address from the grin1 address and use the Foreign API. The next script will return the complete URL of the receiver’s Foreign API, example using the receiver address:
php scripts/php/grin1.php -a grin19f96nfdyl7kjqslqg5j3fu69ejnu82nzewlnc4duehgssg3e9tvq0fsuj5
This will print something like this:
http://fjf2tjne76wsaq7aiusrj42fzst4hktczo7tyvn4zxiqqirzflmljmyd.onion/v2/foreign
Now we can use this address to send the slate to the receiver. The name of the method is receive_tx, this method recieve a tranaction created by another party, returning the modified Slate object, modified with the recipient’s output for the transaction amount, and public signature data. This slate can then be sent back to the sender to finalize the transaction via the Owner API’s finalize_tx method.
Example:
./scripts/bash/foreign/receive_tx.sh "grin19f96nfdyl7kjqslqg5j3fu69ejnu82nzewlnc4duehgssg3e9tvq0fsuj5" slate.json > slate_to_finalize.json
Preparing slate to be sent (Slate > Slatepack Message)
If the receiver is not recheable via TOR, the slate should be encoded now create_slatepack_message which creates a Slatepack from a given slate, optionally encoding the slate with the provided recipient public keys.
Example:
./scripts/bash/$CHAIN/create_slatepack_message.sh $(cat ~/.grin/$CHAIN/.shared_secret) $(cat ./.wallet_token) slate.json
This returned Slatepack Message can be shared now with the receiver. The transaction needs to be finalized now.
Finalizing a transaction
After all parties have filled in both rounds of Slate generation, a transaction is “Finalized”. This step adds all participants’ partial signatures to create the final signature, resulting in a final transaction that is ready to post to a node.
Note: This function DOES NOT POST THE TRANSACTION to a node for validation. This is done separately via the post_tx function.
To finalize the transaction finalize_tx must be called, this method receives a slate and a token.
First, we need to get the slate from the Slatepack Message:
./scripts/bash/$CHAIN/slate_from_slatepack_message.sh $(cat ~/.grin/$CHAIN/.shared_secret) $(cat ./.wallet_token)
Now we need to lock the outputs associated with the inputs to the transaction by using the tx_lock_outputs method.
./scripts/bash/$CHAIN/tx_lock_outputs.sh $(cat ~/.grin/$CHAIN/.shared_secret) $(cat ./.wallet_token) slate_to_finalize.json
If we now get the wallet summary, we should see the amount (including fees) awaiting to be finalized:
$ ./scripts/bash/$CHAIN/retrieve_summary_info.sh $(cat ~/.grin/$CHAIN/.shared_secret) $(cat ./.wallet_token) | jq '.[1]'
{
  "amount_awaiting_confirmation": "0",
  "amount_awaiting_finalization": "377000000",
  "amount_currently_spendable": "0",
  "amount_immature": "0",
  "amount_locked": "500000000",
  "amount_reverted": "0",
  "last_confirmed_height": "1826310",
  "minimum_confirmations": "1",
  "total": "0"
}
Now we pass the slate to the finalize_tx method to finalize the transaction.
./scripts/bash/$CHAIN/finalize_tx.sh $(cat ~/.grin/$CHAIN/.shared_secret) $(cat ./.wallet_token) slate_to_finalize.json > finalized.slate.json
The returned slate must now be posted.
Posting a transaction
Transactions need to be broadcasted. For this we need to call the post_tx method, this method posts a completed transaction to the listening node for validation and inclusion in a block for mining. This method receives a slate and a token.
./scripts/bash/$CHAIN/post_tx.sh $(cat ~/.grin/$CHAIN/.shared_secret) $(cat ./.wallet_token) finalized.slate.json
Now the transaction is complete.
Retrieving last known height
To retrieves the last known height known by the wallet we need to call the node_height method. This is determined as follows:
- If the wallet can successfully contact its configured node, the reported node height is returned, and the updated_from_node field in the response is true
- If the wallet cannot contact the node, this function returns the maximum height of all outputs contained within the wallet, and the updated_from_node fields in the response is set to false.
Clients should generally ensure the updated_from_node field is returned as true before assuming the height for any operation.
The only parameter required is token and the structure of the call is like this:
{
    "jsonrpc": "2.0",
    "method": "node_height",
    "params": {
        "token": "d202964900000000d302964900000000d402964900000000d502964900000000"
    },
    "id": 1
}
You can also use the bash script included inside this repository:
./scripts/bash/$CHAIN/node_height.sh $(cat ~/.grin/$CHAIN/.shared_secret) $(cat ./.wallet_token)
Output:
{
  "header_hash": "000071a9ff3bf8bcee8106597efb5d672346d49b5d2c7197873c75a756b9fc78",
  "height": "1825812",
  "updated_from_node": true
}
If you want to parse the output to save the values in separated variables, you can do that by using jq:
read header_hash height updated_from_node < <(echo $(./scripts/bash/$CHAIN/node_height.sh $(cat ~/.grin/$CHAIN/.shared_secret) $(cat ./.wallet_token) | jq -r '.header_hash, .height, .updated_from_node'))
To confirm we just need to echo the variables:
$ echo $header_hash $height $updated_from_node
0001a006818e60dca117b22ee7df973330e260eb37bd74197e4e84490af138f0 1825828 true
Extras
Create an account inside a wallet
An account is a mapping of a user-specified label to a BIP32 path. The Address path (BIP32) defines how to derive private and public keys of a wallet from a binary master seed (m) and an ordered set of indices.
This can be done using the method create_account_path and the json structure is the follow:
{
    "jsonrpc": "2.0",
    "method": "create_account_path",
    "params": {
        "token": "d202964900000000d302964900000000d402964900000000d502964900000000",
        "label": "account1"
    },
    "id": 1
}
Where token is the token of the opened wallet and label is a human readable label to which to map the new BIP32 Path.
./scripts/bash/$CHAIN/create_account_path.sh $(cat ~/.grin/$CHAIN/.shared_secret) $(cat ./.wallet_token)
Setting the active account
You just need to call the method: create_account_path with the json structure like the follow:
{
    "jsonrpc": "2.0",
    "method": "set_active_account",
    "params": {
        "token": "d202964900000000d302964900000000d402964900000000d502964900000000",
        "label": "account1"
    },
    "id": 1
}
Where token is the token of the opened wallet and label is a human readable label of the BIP32 Path. The default label is default.
./scripts/bash/$CHAIN/set_active_account.sh $(cat ~/.grin/$CHAIN/.shared_secret) $(cat ./.wallet_token)
Listing wallet accounts
This can be done using the method accounts and the json structure is the follow:
{
    "jsonrpc": "2.0",
    "method": "accounts",
    "params": {
        "token": "d202964900000000d302964900000000d402964900000000d502964900000000",
    },
    "id": 1
}
Where token is the token of the opened wallet.
./scripts/bash/$CHAIN/accounts.sh $(cat ~/.grin/$CHAIN/.shared_secret) $(cat ./.wallet_token)
Output:
[
  {
    "label": "default",
    "path": "0200000000000000000000000000000000"
  }
]
Setting the top level directory
You can specify the directory where the wallet information will be stored. If you are not using an encrypted volume at least, try to use an encrypted filesystem in user-space. To do this, we need to call the set_top_level_directory endpoint.
./scripts/bash/$CHAIN/set_top_level_directory.sh $(cat ~/.grin/$CHAIN/.shared_secret)
Getting the wallet seed phrase or recovery phrase
A recovery phrase (sometimes known as a seed phrase) is a series of words generated by your cryptocurrency wallet that gives you access to the crypto associated with that wallet. Think of a wallet as being similar to a password manager for crypto, and the recovery phrase as being like the master password. As long as you have your recovery phrase, you’ll have access to all of the crypto associated with the wallet that generated the phrase - even if you delete or lose the wallet.
To get the seed phrase call the method get_mnemonic like this:
{
    "jsonrpc": "2.0",
    "method": "get_mnemonic",
    "params": {
        "token": "d202964900000000d302964900000000d402964900000000d502964900000000",
        "password": "my_secret_password"
    },
    "id": 1
}
./scripts/bash/$CHAIN/get_mnemonic.sh $(cat ~/.grin/$CHAIN/.shared_secret) $(cat ./.wallet_token)
Getting stored transactions
In order to get a stored transaction, we could use the transaction slate id as a parameter for the get_stored_tx method like this:
{
    "jsonrpc": "2.0",
    "method": "get_stored_tx",
    "id": 1,
    "params": {
        "token": "d202964900000000d302964900000000d402964900000000d502964900000000",
        "id": null,
        "slate_id": "0436430c-2b02-624c-2032-570501212b00"
    }
}
Example:
./scripts/bash/$CHAIN/get_stored_tx.sh.sh $(cat ~/.grin/$CHAIN/.shared_secret) $(cat ./.wallet_token) "b0b35789-4e91-4344-9c8a-10a7c1fa7cff"
Getting Foreign API version
check_version return the version capabilities of the running Foreign API of a wallet:
{
    "jsonrpc": "2.0",
    "method": "check_version",
    "id": 1,
    "params": {}
}
Example:
./scripts/bash/foreign/check_version.sh "grin19f96nfdyl7kjqslqg5j3fu69ejnu82nzewlnc4duehgssg3e9tvq0fsuj5"
Finalizing transaction using Foreign API
finalize_tx finalizes a (standard or invoice) transaction initiated by this wallet’s Owner api. This step assumes the paying party has completed round 1 and 2 of slate creation, and added their partial signatures. This wallet will verify and add their partial sig, then create the finalized transaction, ready to post to a node.
This function posts to the node. Posting can be also done in separately via the post_tx function.
This function also stores the final transaction in the user’s wallet files for retrieval via the get_stored_tx function.
{
   "jsonrpc":"2.0",
   "method":"finalize_tx",
   "id":1,
   "params":[
      {
         "ver":"4:2",
         "id":"0436430c-2b02-624c-2032-570501212b00",
         "sta":"I2",
         "off":"383bc9df0dd332629520a0a72f8dd7f0e97d579dccb4dbdc8592aa3d424c846c",
         "fee":"23500000",
         "sigs":[
            {
               "xs":"02e3c128e436510500616fef3f9a22b15ca015f407c8c5cf96c9059163c873828f",
               "nonce":"031b84c5567b126440995d3ed5aaba0565d71e1834604819ff9c17f5e9d5dd078f",
               "part":"8f07ddd5e9f5179cff19486034181ed76505baaad53e5d994064127b56c5841be7bf31d80494f5e4a3d656649b1610c61a268f9cafcfc604b5d9f25efb2aa3c5"
            }
         ],
         "coms":[
            {
               "f":1,
               "c":"087df32304c5d4ae8b2af0bc31e700019d722910ef87dd4eec3197b80b207e3045"
            },
            {
               "f":1,
               "c":"08e1da9e6dc4d6e808a718b2f110a991dd775d65ce5ae408a4e1f002a4961aa9e7"
            },
            {
               "c":"09ede20409d5ae0d1c0d3f3d2c68038a384cdd6b7cc5ca2aab670f570adc2dffc3",
               "p":"6d86fe00220f8c6ac2ad4e338d80063dba5423af525bd273ecfac8ef6b509192732a8cd0c53d3313e663ac5ccece3d589fd2634e29f96e82b99ca6f8b953645a005d1bc73493f8c41f84fb8e327d4cbe6711dba194a60db30700df94a41e1fda7afe0619169389f8d8ee12bddf736c4bc86cd5b1809a5a27f195209147dc38d0de6f6710ce9350f3b8e7e6820bfe5182e6e58f0b41b82b6ec6bb01ffe1d8b3c2368ebf1e31dfdb9e00f0bc68d9119a38d19c038c29c7b37e31246e7bba56019bc88881d7d695d32557fc0e93635b5f24deffefc787787144e5de7e86281e79934e7e20d9408c34317c778e6b218ee26d0a5e56b8b84a883e3ddf8603826010234531281486454f8c2cf3fee074f242f9fc1da3c6636b86fb6f941eb8b633d6e3b3f87dfe5ae261a40190bd4636f433bcdd5e3400255594e282c5396db8999d95be08a35be9a8f70fdb7cf5353b90584523daee6e27e208b2ca0e5758b8a24b974dca00bab162505a2aa4bcefd8320f111240b62f861261f0ce9b35979f9f92da7dd6989fe1f41ec46049fd514d9142ce23755f52ec7e64df2af33579e9b8356171b91bc96b875511bef6062dd59ef3fe2ddcc152147554405b12c7c5231513405eb062aa8fa093e3414a144c544d551c4f1f9bf5d5d2ff5b50a3f296c800907704bed8d8ee948c0855eff65ad44413af641cdc68a06a7c855be7ed7dd64d5f623bbc9645763d48774ba2258240a83f8f89ef84d21c65bcb75895ebca08b0090b40aafb7ddef039fcaf4bad2dbbac72336c4412c600e854d368ed775597c15d2e66775ab47024ce7e62fd31bf90b183149990c10b5b678501dbac1af8b2897b67d085d87cab7af4036cba3bdcfdcc7548d7710511045813c6818d859e192e03adc0d6a6b30c4cbac20a0d6f8719c7a9c3ad46d62eec464c4c44b58fca463fea3ce1fc51"
            }
         ]
      }
   ]
}
Example:
./scripts/bash/foreign/finalize_tx.sh slate_to_finalize
Contributors
Author:
Editors: